You can configure the following on the Workflow Settings tab:
- Set Default Workflow Stage (Trigger Point): You can set a default first stage of workflows.
- Enterprise Workflow Settings: You can control the appearance of previous stages on the workflow screen.
To configure workflow settings, follow these steps:
- Go to Application Menu > Settings > Miscellaneous Configurations > Workflow Settings.
- Click
 .
. - Use the following sections:
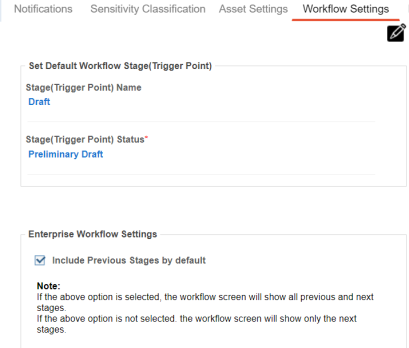
- Set Default Workflow Stage(Trigger Point)
Use this section to configure a default first stage of workflows. This stage is applicable to all workflows. By default, both, the stage name and status, are set to Draft.
To set the default first stage, use the following options:
- Stage(Trigger Point) Name
- You can edit the first stage's name. This name is applicable to all workflows.
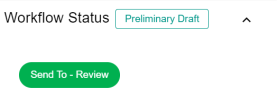
- For example, the following image displays the first stage as First Draft.

- Stage(Trigger Point) Status
- You can edit the status that is displayed for the first stage. This status is applicable to all workflows.
- For example, the following image displays the status of First Draft as Preliminary Draft for a business term.
- Enterprise Workflow Settings
- Use this section to control the appearance of previous workflow stages on the workflow screen.
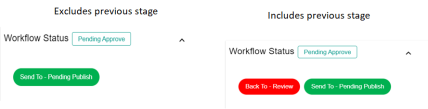
- To include previous workflow stages, select the Include Previous Stages by default check box.
- For example, the following image displays workflow status of a business term with and without a previous stage.
- Click
 .
.
The following page appears.
Workflow settings are configured.
|
Copyright © 2024 Quest Software Inc. |